
Goal
After reading this article you'll able to
customise channel icons and websites
publish different website types
understand website visibility and tab configuration
create appropriate search results
create past articles
Summary
Websites/News Channel is a dedicated channel that emulates an internet browser. In this familiar format, players can use the web channel just like the regular web.
| Name | Websites/News Channel |
| Benefit | Reproduce an online ecosystem
based on websites from a secure
and protected environment for
training. |
| Features |
|
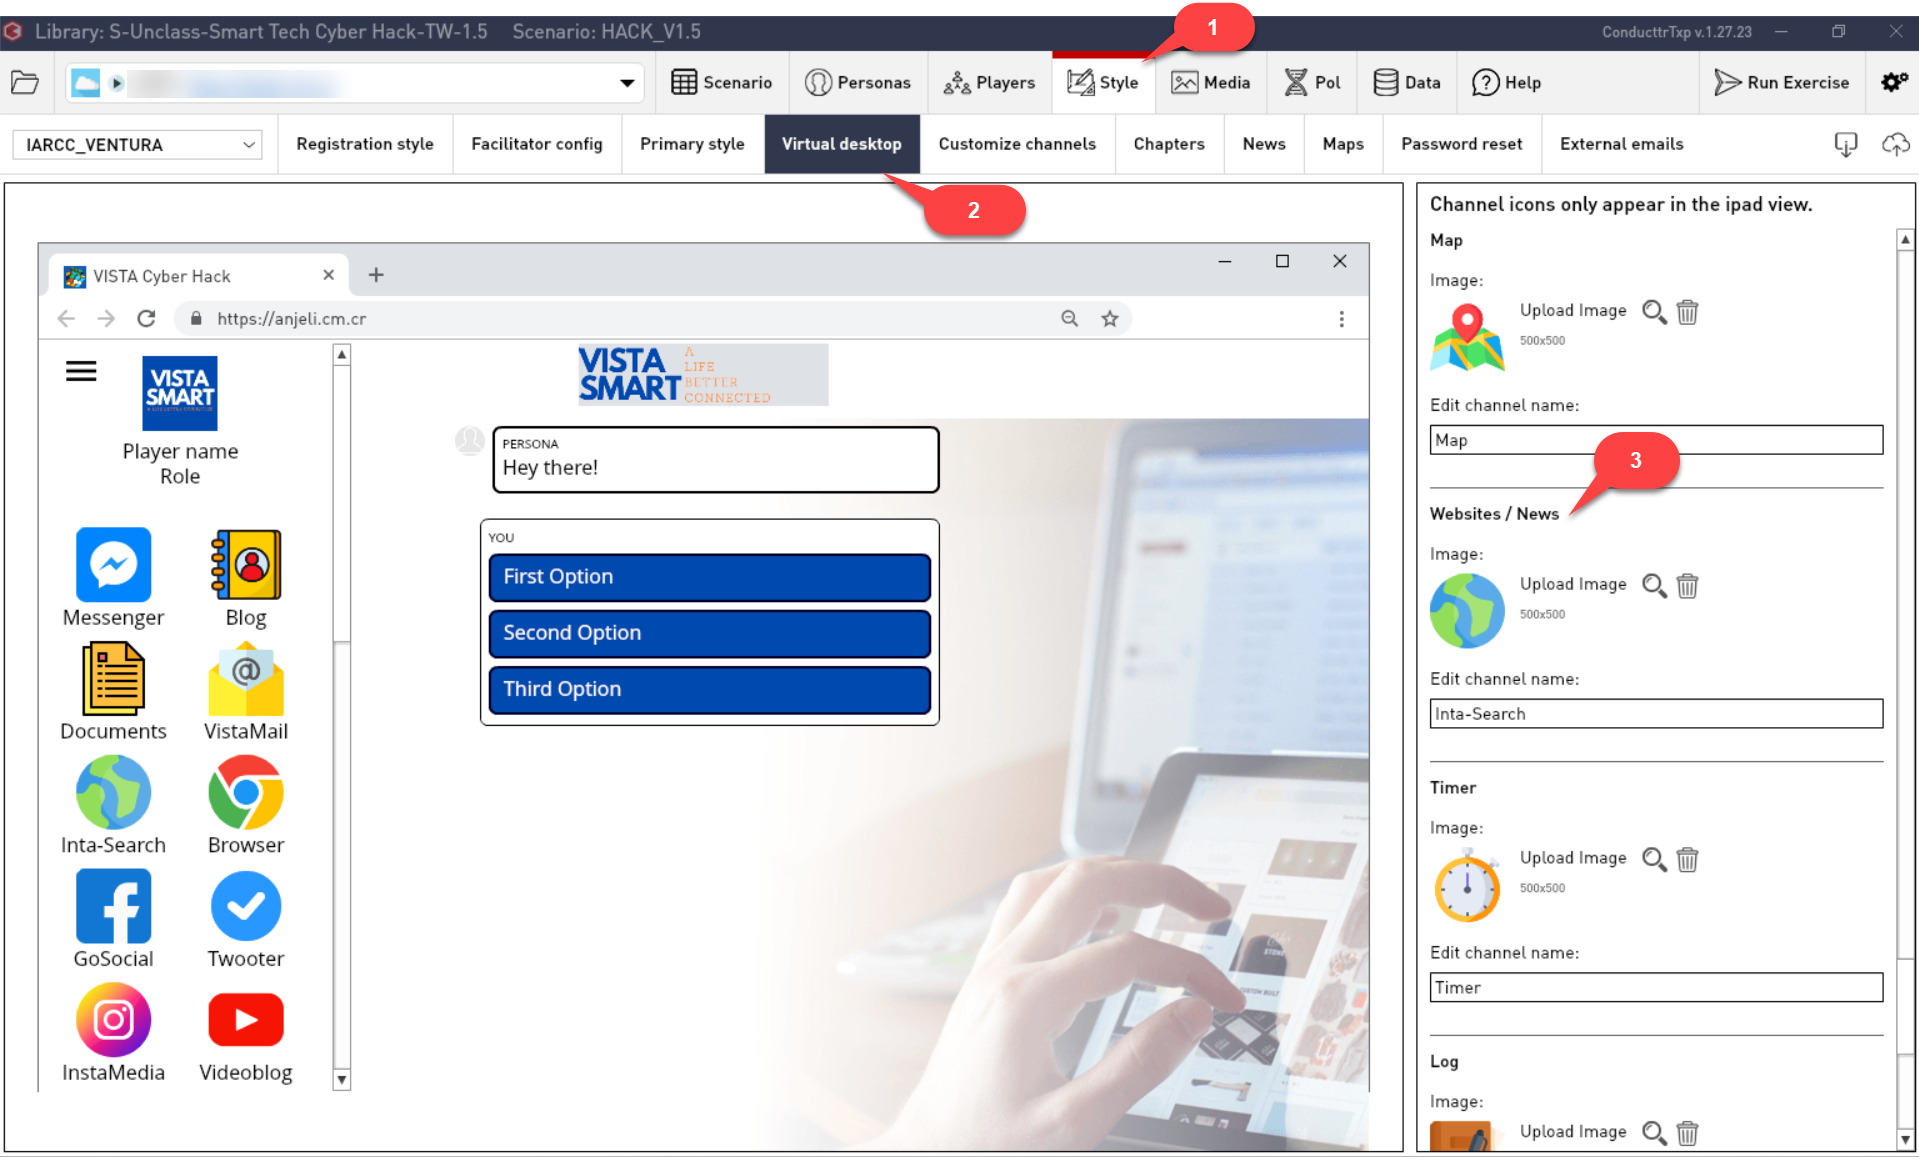
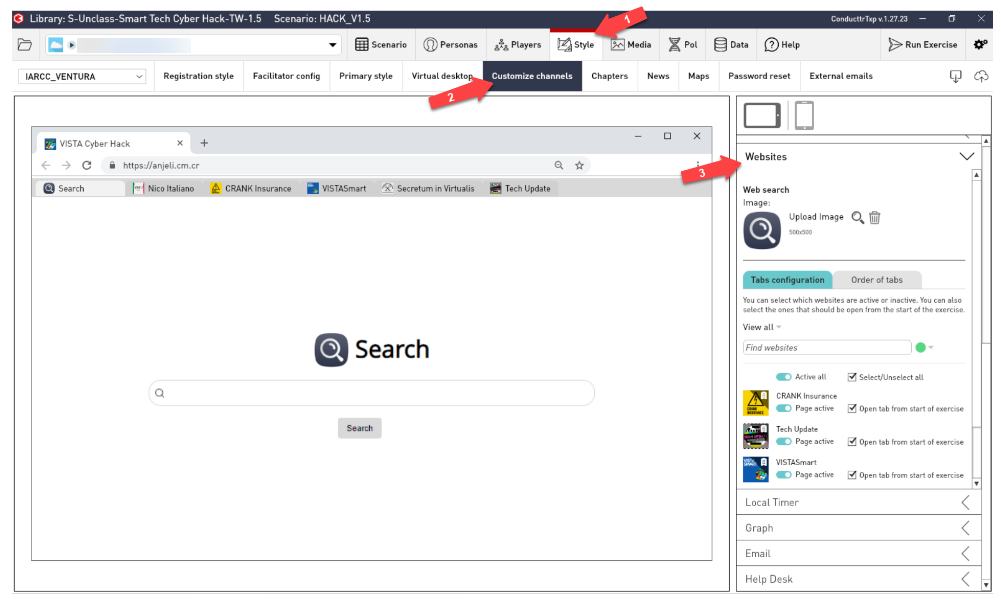
Customizing Channel Icons
You can change the icon or name of
the channel in the Scenario Editor, in Style > Virtual Desktop > Websites /
News
Website Configuration
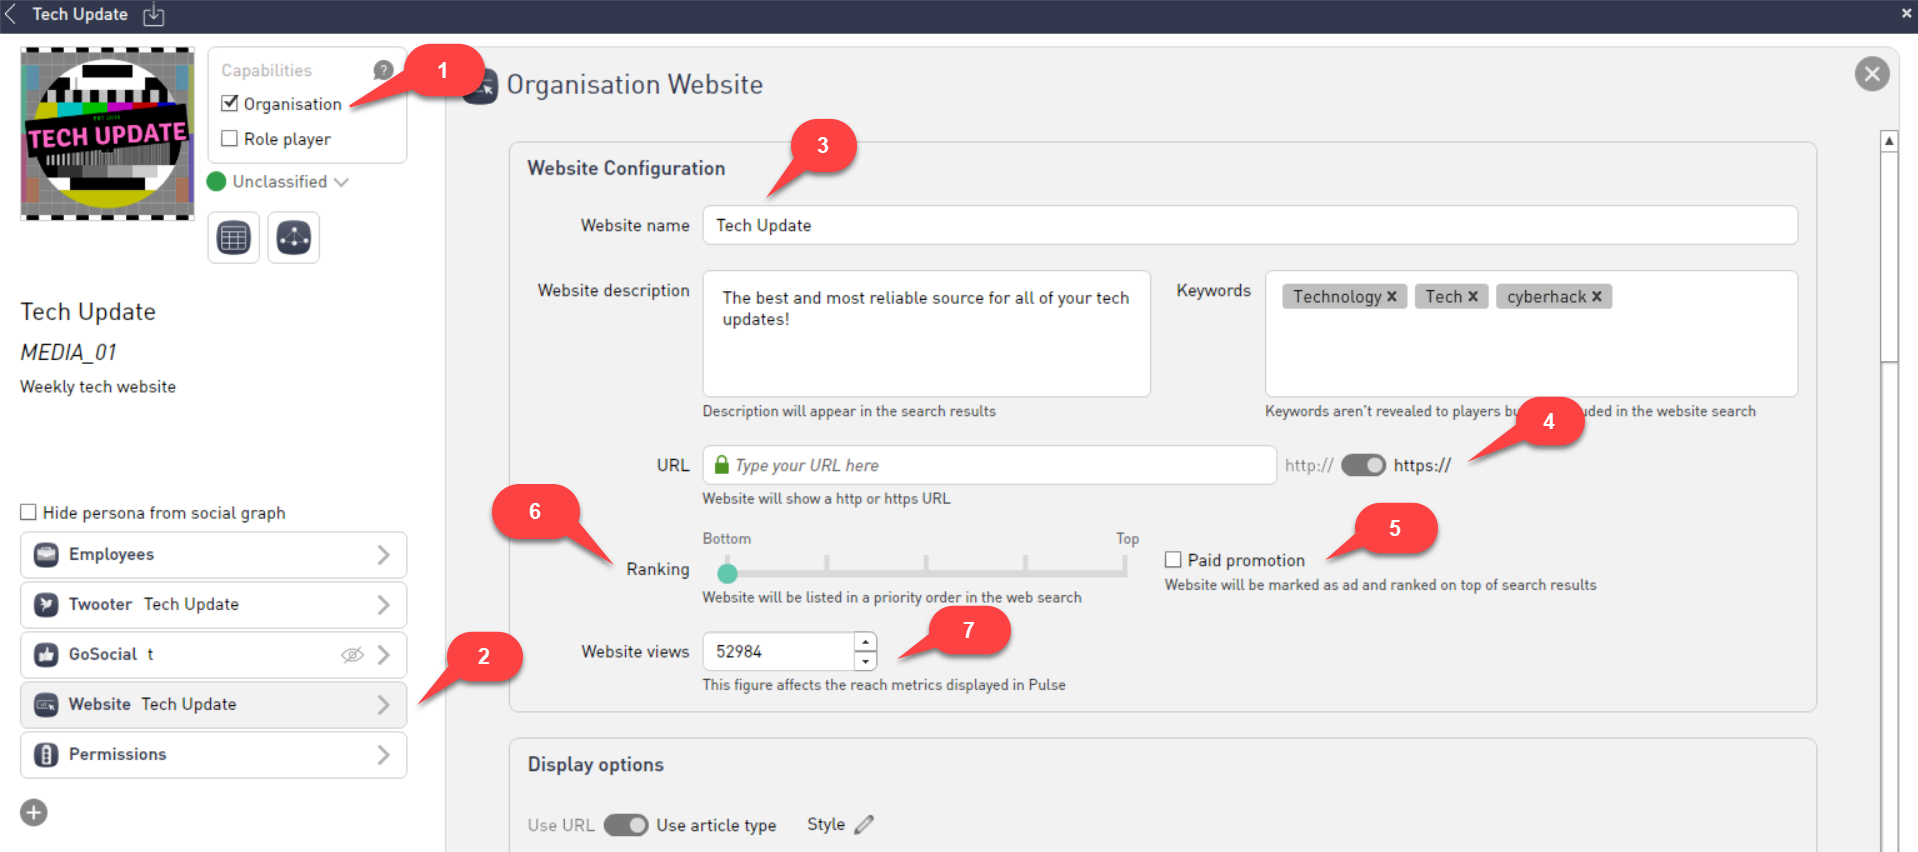
Create a new persona
or select an existing
one. 1. Mark as Organisation. 2. Go to Website section from the list
of
available
channels. 3. Put in the
website name and
description. (The
description you add here
will appear in the search
results.) Add keywords to
boost the visibility of
the website. (The keywords
will not be revealed to
the players but are
included in the web
search) 4.You can
type in the url you
want as well as use
the toggle to
determine whether you
want it to say
'https://' 5. Tick
the paid promotion
checkbox if you
want the website
to appear on top
of the search
results marked as
an ad. 6. The
ranking of website can
be adjusted by setting
the priority. 7. You can
boost the website
views as per your
liking. However, note
that boosting views
here will affect the
metrics shown in the
social
map. |
Website Types
There are two types of websites you
can
add to your scenario:
1. URL-based websites
2. Article-based websites
1. URL-based websites
These websites use a working URL
that gets embedded on the Websites channel. These are useful for highly
customized websites that you have created
in a website builder (such as Mobirise) or real
websites that you can find a real browser
(i.e. https://www.conducttr.com)
1. Create a new persona
or select an existing
one. 2. Follow the steps mentioned in the website configuration above and then scroll down to 'Display Options' and select 'Use URL' on the toggle button. 3. Click on Add
website (Change
website if you had
a previous one). | 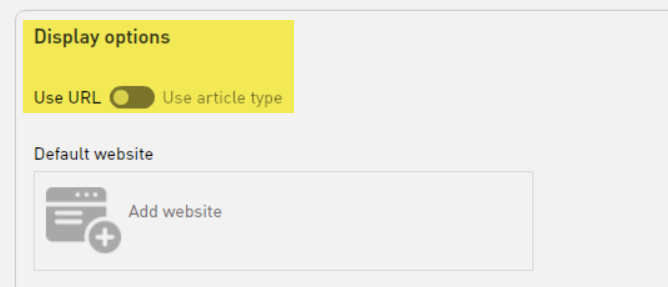 |
4. In
the Manage media window, click New 5. Click From URL and type your desired destination. 6. Insert the URL into Asset ID too. 7. Hit Save. | 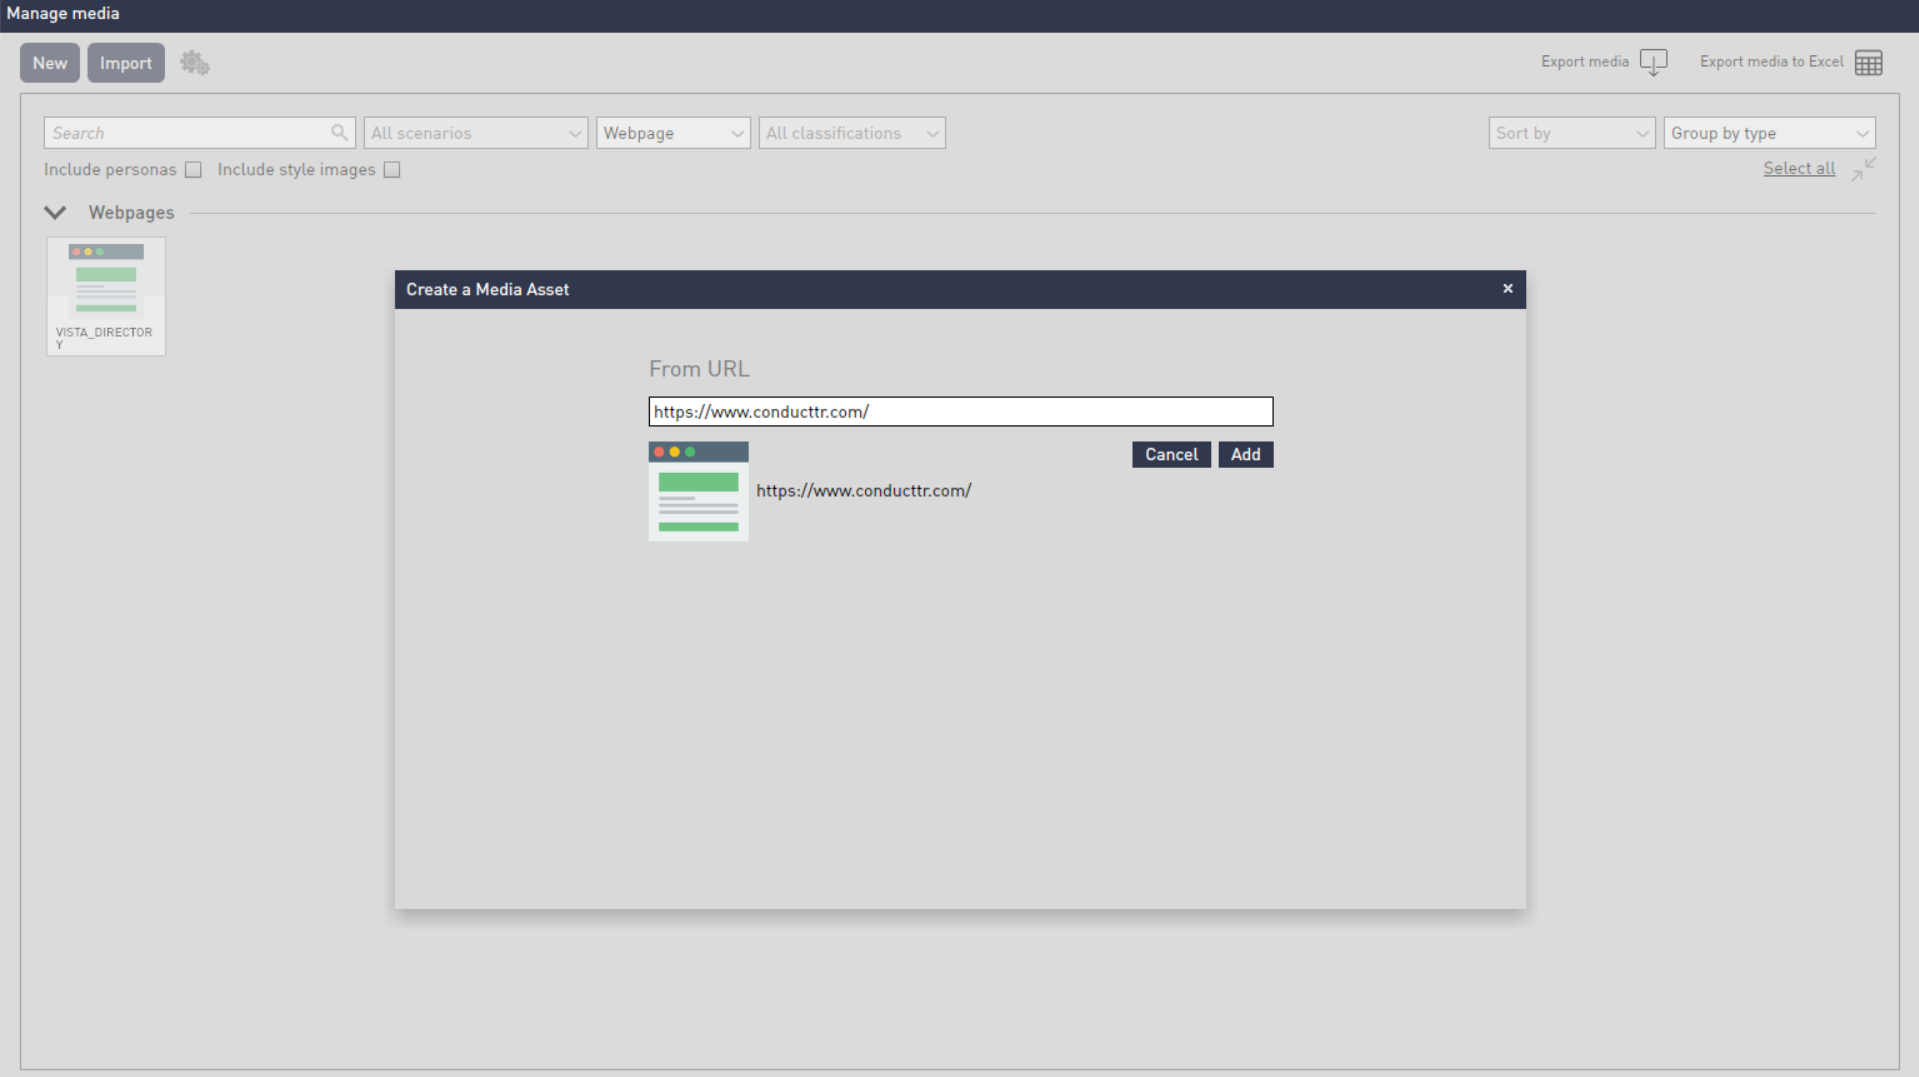 |
8. To publish a new URL
website during your exercise,
in the Scenario Editor go to Scenario. 9. Select your persona or click +Add inject (bottom left) and select your persona. 10. Then under 'What method?' select the website
channel 11. Click on 'Default website' dropdown if you do not wish to publish your default
website and select change website. (For example, if you want to display a hacked version
of the same website). 12. Click on save and close. | 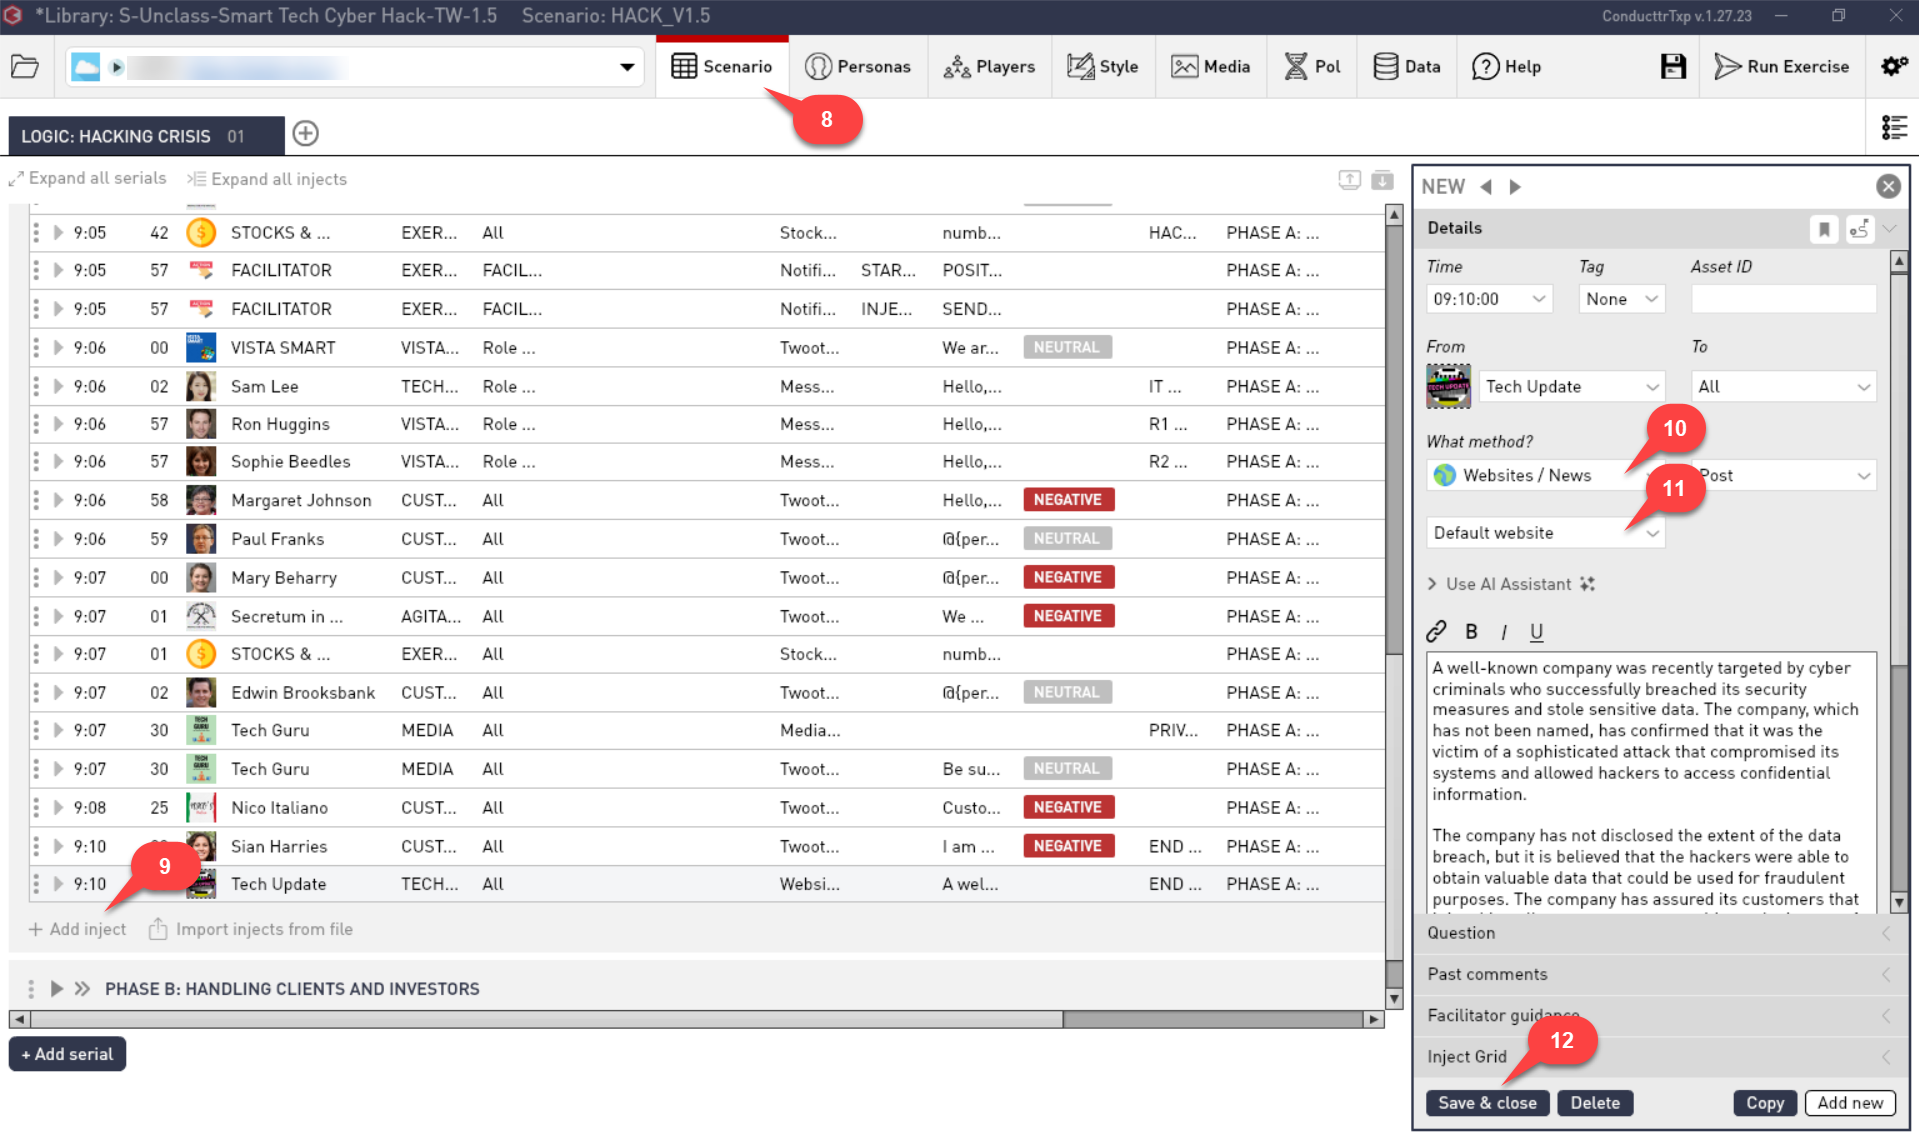 |
2. Article-based websites
These websites create a
blog-style framework, where you will be
able to publish different articles during
your exercise so they are all displayed in
a familiar format. This is particularly
useful for News organizations.
1. Create a new persona or select an existing one. 2. Follow the steps mentioned in the website configuration above and then scroll down to 'Display Options' and select 'Use article type' on the toggle button. | 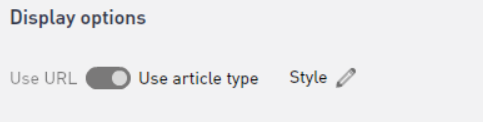 |
3. Click on Style (pencil icon) 4. Customize header, fonts and colours to make it look like your desired website. Alternatively, you can import from a News style file with a .txws extension (check some examples on Ventura). 5. Hit the Back arrow in the top left corner, then Save. | 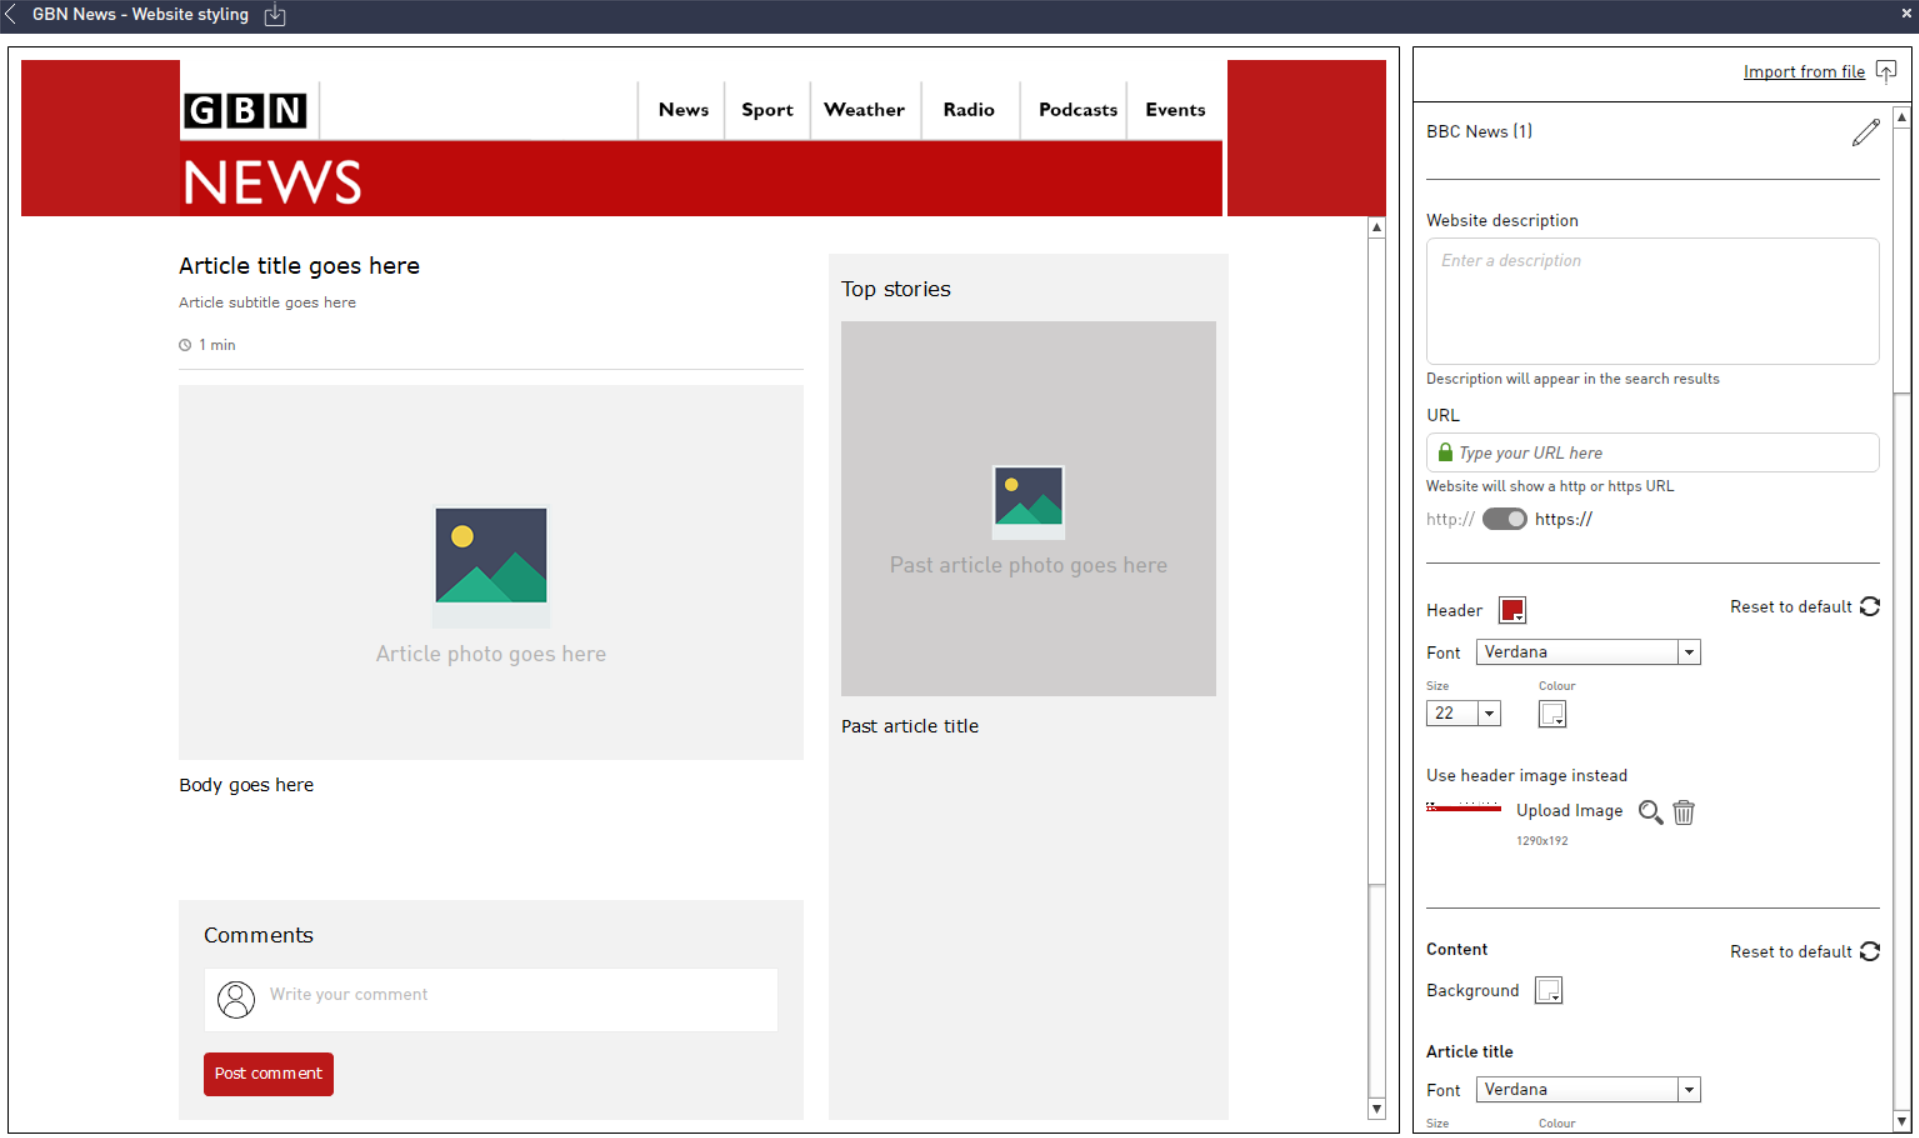 |
6. To publish a new article during your exercise, click Scenario in the Scenario Editor. 7. Click +Add inject (bottom left corner) and select your persona and the website channel. 8. Add Title, Subtitle, Body and images or video for the news article. Use AI assistant by giving text prompts to save your time. 9. You can also add a website description that will be visible in the web search. The words used in the content will also be useful for enhancing search results. 10. Update the inject by adding a question if it is relevant to your scenario, as well as past comments to make the article more authentic. | 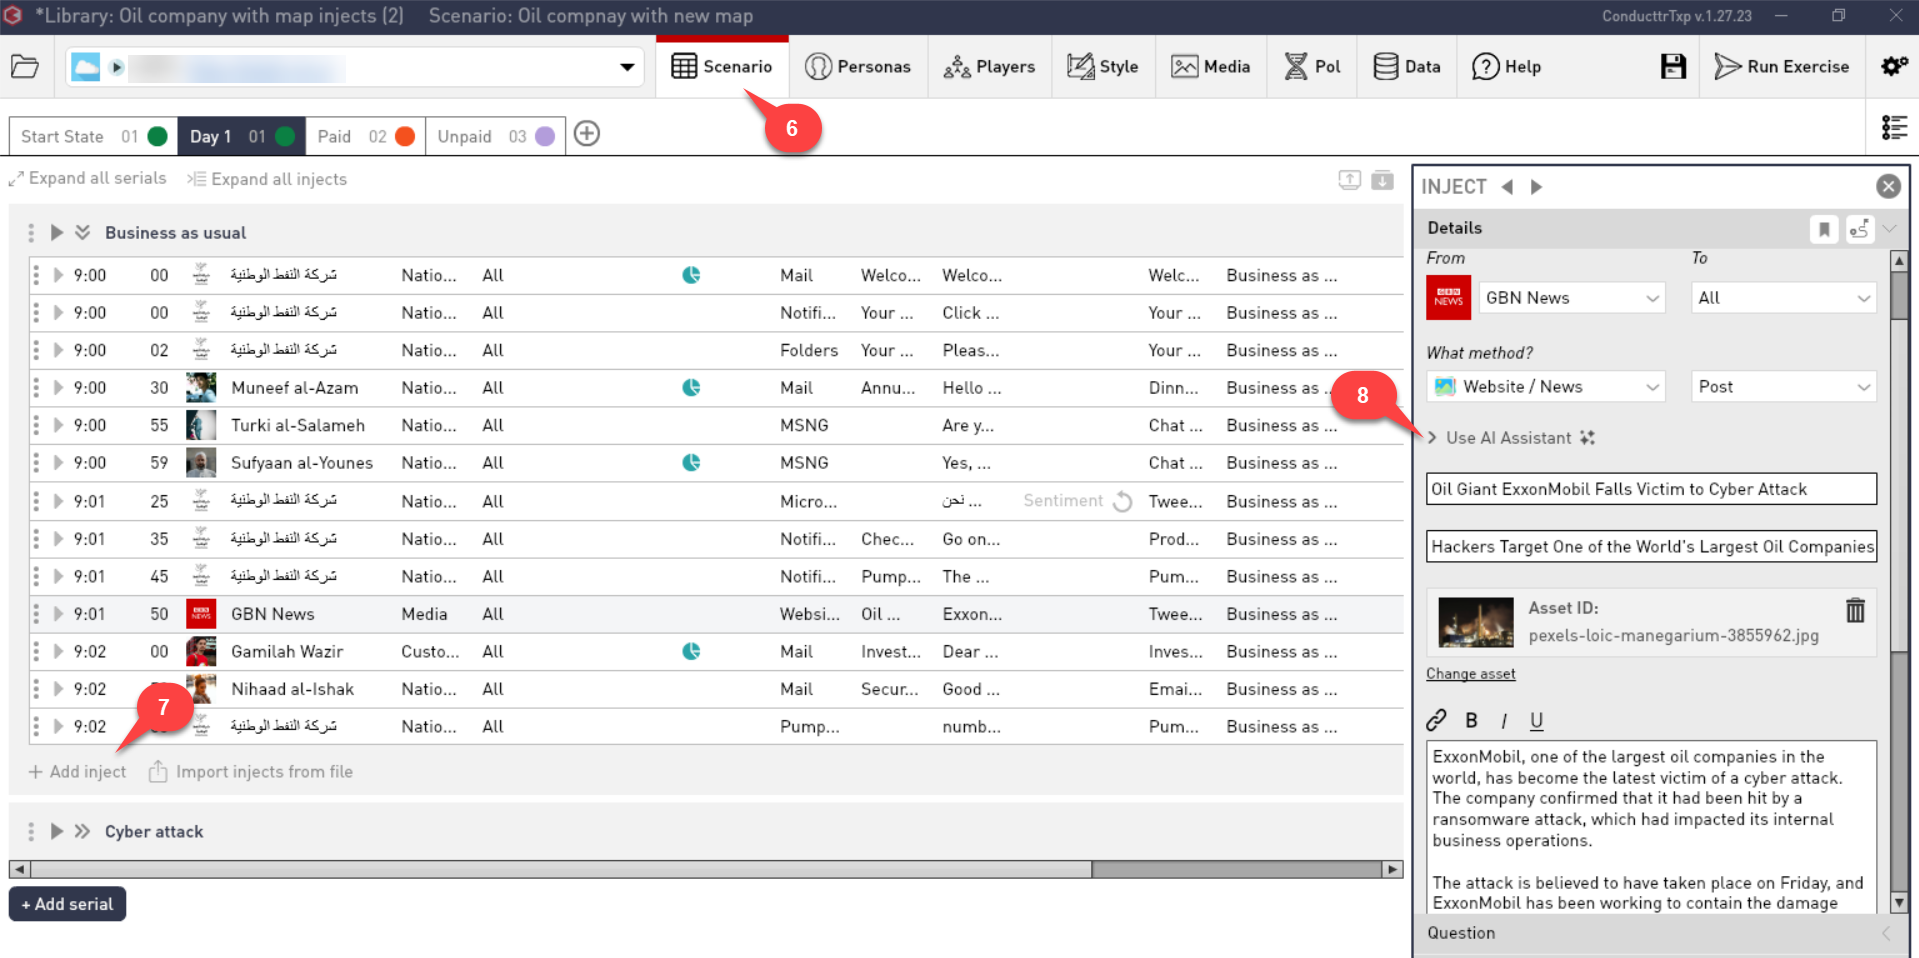 |
Website Visibility and Tab Configuration
In the Scenario Editor, you can
select websites visibility. Go to Style
> Customize channels >
Websites
Show websites: New
articles will be published and visible
depending on your configuration in your
Master Event List.
Hide websites: New
articles will not be visible when
published, players will need to find them
using search terms in the Search
engine (see below)
You can also upload an image that will appear upon searching for content on the web.
In the tabs configuration, you can set websites to active or inactive as well as to open once the exercise starts.
In the 'Order of tabs', you can add the order of your preference suitable for your exercise. You can choose to do it manually or have to arrange based on the number of views, alphabetically or disposition. | 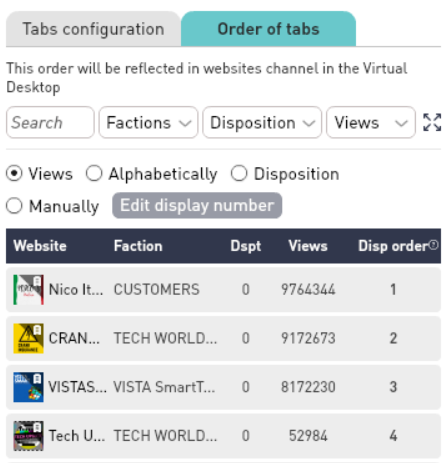 |
Searching and Search Results
Searching in the Websites/News channel
also includes results from social media
channels you have enabled and will find
personas as well as content.
The following examples
illustrate how you can use logic operators
in your search.
News agencies
This will find all mentions
of "news agencies" where the words are
together. It won't find "news and
other agencies"
News AND agencies
This will find "news and
other agencies" because both search
terms exist in the content.
News OR agencies
This will find articles,
websites and social media with either
"news" or "agencies".
You can use parenthesis to
group search terms.
News AND (agencies OR outlets)
This will find all
articles and social media mentioning
"news" with either "agencies" or
"outlets"
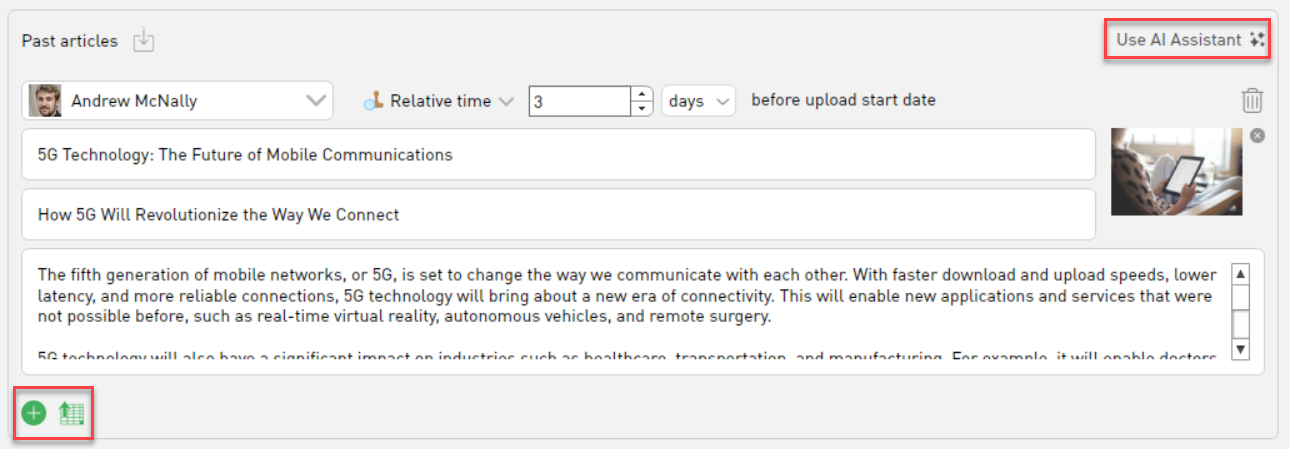
Past articles
In article-based websites, you can
prepare a set of articles to be
available when the user first logs in,
so the website, news page or blog
feels lived in.
1. In the Scenario
Editor, go to Personas > Select your desired
persona. Make sure this
persona is marked as Organization.
2. Select the Website section
and make sure your website
is article-based.
3. Scroll down to find 'Past Articles' section.
3. Click the green plus
button and create as many articles as
you require.
4. You can use the AI assistant by giving it text prompts to save time.
5. You can also set the date of the past articles to make them more realistic.
Alternatively, you can upload
your pre-defined articles from a .csv
file by clicking on the green box next to the green plus.
The save symbol next to 'Past articles' can be used to download a blank template for .csv upload. If past articles section is populated, use it to download predefined articles in .csv format.